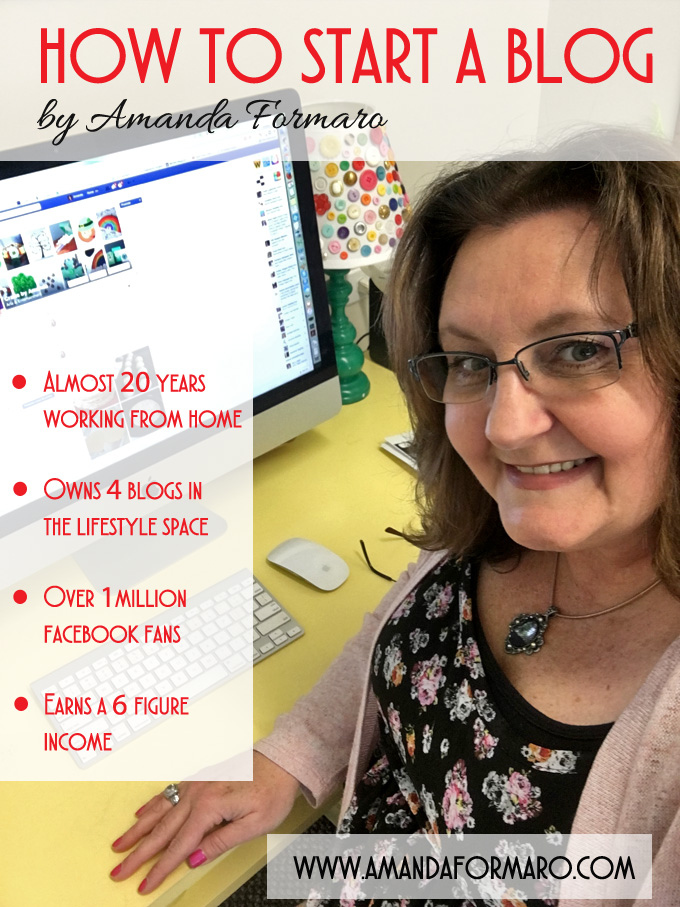
This question: “How do I start a blog“? I receive questions all the time about crafts, recipes and blogging. One of the most common is how to start a blog. So I thought it was high time to address the question and help get you started on your own path to being a blogger and earning an income from home. When I started working from home back in 1997 (that’s not a typo, almost 20 years ago!), blogs weren’t around yet. I owned a website for ten years, sold it in 2007 then decided to start a blog a few months later. When I started my first blog, there really weren’t any instructions out there. You just opened a free blog and learned as you went along. It was unchartered territory.
Note: I don’t recommend opening a free blog like you can get on Blogger or WordPress. You want to have complete control over your website, which is why you will need this guide.
How to Start a Blog on WordPress
First of all, WordPress in my opinion is the best platform out there for bloggers and it’s definitely the most popular. There are all sorts of plugins (kind of like apps on your phone) to help enhance your site. All four of my blogs are on the WordPress platform. But we aren’t going to get ahead of ourselves. First, the basics, getting started!
Starting a blog is really easy, much easier than it was when I started and blogs were so new. It takes less than 20 minutes and is the first step to being your own boss, staying home with your family, and doing something you love. I worked from home for 18 years, long enough to raise my family and build a successful home business. Now I work from my studio most of the week and am able to still do some things from home as well. Freedom!
Step 1: Pick a name
Before you do anything, you need to decide what you’d like your name to be. I highly recommend sticking with something that helps the reader know what your website is about. For example my blogs, “Crafts by Amanda” and “Amanda’s Cookin’” are obviously about crafts and recipes. Decide what you’d like to write about and pick a name that will clue people in about the kind of content they will find on your blog. You may also want to seriously consider owning your name as a domain if you don’t already.
Step 2: Set up a site
Once you decide on your name, you can register your name directly through Bluehost because they will give you your first year of domain name registration for FREE when you pay for 12 months of hosting up front. Doing this also gets you a discount on the monthly cost of web hosting – you can even pay for up to 36 months in advance for even more savings. Awesome!
Click here to get started setting up your domain and choosing your plan. You basically have 3 entry level hosting options available to you. I would personally start with the basic plan and then upgrade later as needed.
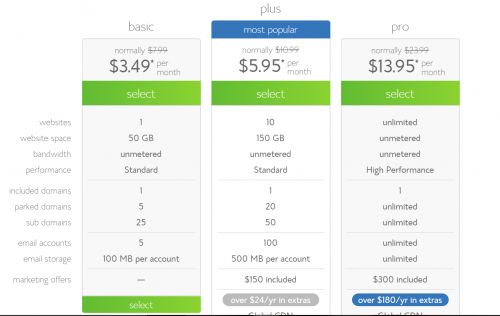
Once you select the plan you want to go with, you will register your domain name. If you already happen to have a domain name registered that you want to use, you can connect it to your Bluehost account here as well. If the domain name you want to use is already taken, Bluehost will let you know and will also suggest similar names you could use instead. You can choose one of Bluehost’s ideas or come up with another idea on your own.
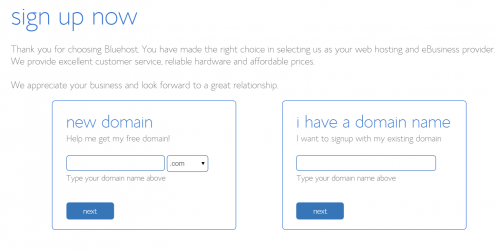
Once you’ve selected your domain, give them your contact info. Next, it will bring you to a screen that looks like this to finish confirming your package and extras.
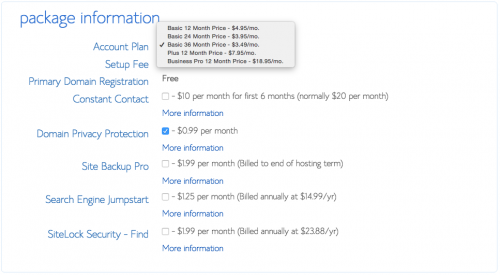
For now, you probably want to skip a lot of these extras except for domain privacy protection. Domain privacy protection means that Bluehost will list their address as the address registered to your website instead of your personal home address.
When you sign up for your hosting through the links in this tutorial, you will get the best monthly prices possible AND that extra discount I mentioned earlier for buying multiple months of service up front.
Not sure you are in this for the long term?
Bluehost will actually give you your money back for any unused months of hosting if you cancel later! For this reason, I would really encourage you to buy 36 months of hosting up front to get the biggest bang for your buck.
Once you’ve made it past this screen, you just need to enter your payment info and enter a password (this is NOT the time to use “password” or “12345” – choose something “strong” and hard to guess or hack).
Congrats! You’re halfway there!
The next thing you need to do for turning your domain name and hosting package into a blog is to install WordPress.
Step 3: Install WordPress:
Click the link in your confirmation email to go to your Bluehost account. (you can also do this by clicking here and signing in). Then click the link at the top that says “cpanel”. You’ll end up on a screen that looks like this:
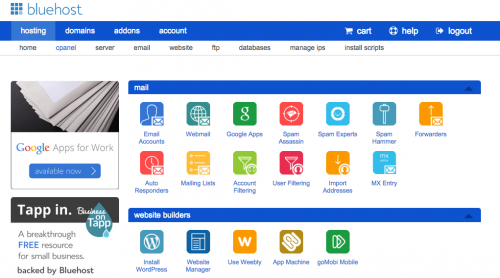
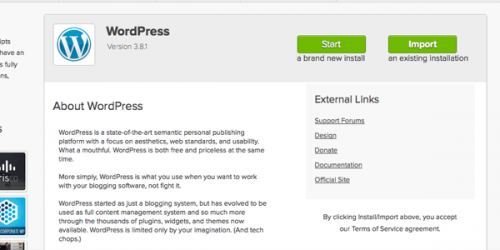
Go down to the section that says “website builders” and click on the “install WordPress” button to install WordPress. It will bring you to this screen where you will click the green “start” button to get started.
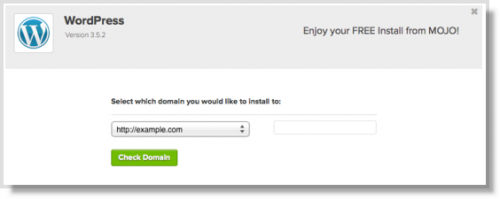
Next, it will ask you to choose where to install WordPress. Use the drop down menu here to select the website you want to run WordPress on (hint: the one you just bought!). Once you select it, choose “check domain” to check for any problems you might run into during the install. If this is your brand new domain, everything should be good to go!
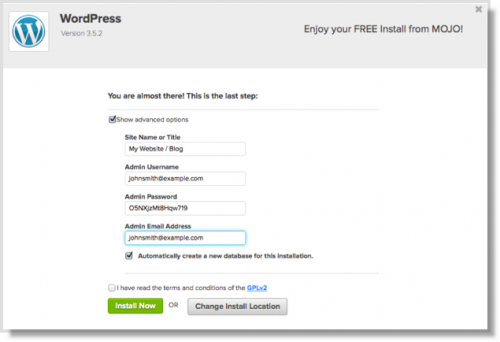
For the final step, you want to click to “Show Advanced Options”. This is where you will choose a username and password. Pro tip: Choose a strong (hard to guess) password as well as a user name that isn’t “admin”. This will help make your site more difficult to hack. Also be sure to click the “Automatically create a new database for this installation” box as well as the box indicating that you read the terms and conditions. Then click “Install Now”
Congrats again! WordPress is now set up on your site!
To log in to your new WordPress site, go to http://www.(your URL here).com/wp-admin
What to do next:
Now that you have a WordPress site that is up and running here are some more things to consider doing.
- Design your site (or hire someone to do it for you). While you can Google lots of information, a comprehensive WordPress reference guide (like this one) will be helpful for this part.
- Start writing. From tutorials to recipes to interesting short stories, start working on content to fill your site.
- Sign up for social media. If you aren’t already on sites like Twitter, Instagram or Pinterest, now is the time to sign up!
I hope you found the information in this guide helpful! Once you set up your website and start adding content, you’ll be on your way to earning an income online. Click here to get started right now!


So, how do you earn money?
There are many ways to earn money from a website. Banner advertising, text advertising, sponsored posts, newsletter ads, but that’s an entirely different article.
thank you i always wanted to know how to do a blog step by stepi have not thought of a website yet i will in time i need to think what im going to do
Thank u”